
Welcome!
Mangaka's Tools
Manga Drawing Process
~ Draft
~ Sketching
~ Inking
- Part 1
- Part 2
- Part 3
- Part 4
~ Screentoning & Touch Up
- Part 1
- Part 2
~ Inserting Text
Basic Drawing In Manga Style
Manga Drawing Process: Screentone & Touch Up - Part 2
Alright, since I'm using software tools for my screentone so I'll skip the real-life screentone procedure. Anyway you still can look them up by refering to How to Draw Manga series.
As mentioned before I'm using a WACOM tablet and Adobe Photoshop tool for my screentone procedure. Here I'll show you how it is done.
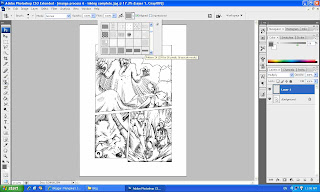
Open up Photoshop software, from there open your manga file and the window should look something like this:

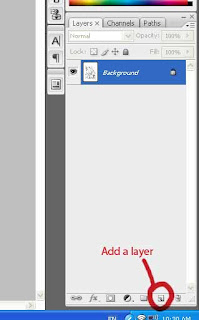
Look for a navigation called Layer at the bottom right of the window. Click on the Create New Layer icon to add in a new layer for your manga.
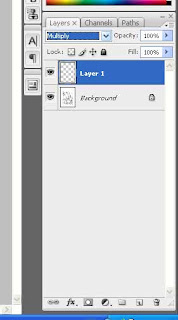
Then with the newly created layer still selected, select Multiply as your layer option. This is a very important element of software implementation, the layer works like adding another layer of paper on top of your original manga, and with Multiply layer option selected, it'll work exactly like a transparent paper.
You'll start your screentoning from this layer onwards, you can always stack other layers of Multiply Layers to create different results, use your creativity.
Now, Photoshop itself doesn't come with screentone patterns, so you'll have to download them yourself. You can get the readily made screentones from the following website.
http://psychobob.xepher.net/screentonez/
This website supplies screentones in .pat and .abr format. Just double click on the file and you'll be redirected to your Photoshop window. You won't be noticing any changes or files being opened though, but once you click on Pattern Stamp Tool option or the Brushes selection option, you'll notice some new patters and brush shapes, these are the screentones for your manga.

If you still couldn't find the Pattern Stamp Tool option, just simply select Shift + S, and you'll be using the Pattern Stamp Tool already. Select the screentone for your manga from the Pattern Picker as shown in the picture below.
As mentioned before I'm using a WACOM tablet and Adobe Photoshop tool for my screentone procedure. Here I'll show you how it is done.
Open up Photoshop software, from there open your manga file and the window should look something like this:
Look for a navigation called Layer at the bottom right of the window. Click on the Create New Layer icon to add in a new layer for your manga.
Then with the newly created layer still selected, select Multiply as your layer option. This is a very important element of software implementation, the layer works like adding another layer of paper on top of your original manga, and with Multiply layer option selected, it'll work exactly like a transparent paper.
You'll start your screentoning from this layer onwards, you can always stack other layers of Multiply Layers to create different results, use your creativity.
Now, Photoshop itself doesn't come with screentone patterns, so you'll have to download them yourself. You can get the readily made screentones from the following website.
http://psychobob.xepher.net/screentonez/
This website supplies screentones in .pat and .abr format. Just double click on the file and you'll be redirected to your Photoshop window. You won't be noticing any changes or files being opened though, but once you click on Pattern Stamp Tool option or the Brushes selection option, you'll notice some new patters and brush shapes, these are the screentones for your manga.
If you still couldn't find the Pattern Stamp Tool option, just simply select Shift + S, and you'll be using the Pattern Stamp Tool already. Select the screentone for your manga from the Pattern Picker as shown in the picture below.
This is basically how it is done.
Manga Drawing Process: Inking - Part 4
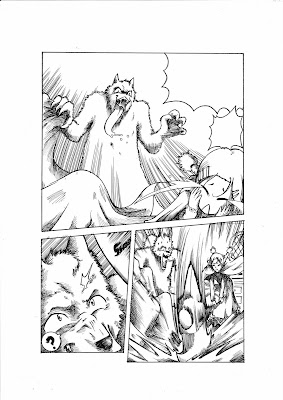
Here I'll show you a sample of manga inking in progress.

 Double check your manga to see if there're any extra lines that were drawn, correct them using white ink or if you're as lazy as I am, you can just scan your manga into computer and correct the flaws using photo-editing software, in this case, I used Photoshop for all my touch up work.
 If you haven't notice anything yet, there are couple of areas that I wanted to touch up in my manga, here I've circled them up for your reference so you know what I'm actually doing.
 Alright, now I'm done with touching up, tada!
Using the sketch from previous chapter, I continued by inking the borders and conversation bubbles of my manga first.
It doesn't matter which part you start inking first actually, it is just my habit to put up boundaries for my manga before everything else.
Next I begin inking the contents using both outlining and hatching techniques. It'll take awhile to finish this y'know, so just take your time and ink your manga slowly. Once you're done inking everything, erase the pencil outline.
Double check your manga to see if there're any extra lines that were drawn, correct them using white ink or if you're as lazy as I am, you can just scan your manga into computer and correct the flaws using photo-editing software, in this case, I used Photoshop for all my touch up work.If you haven't notice anything yet, there are couple of areas that I wanted to touch up in my manga, here I've circled them up for your reference so you know what I'm actually doing.Alright, now I'm done with touching up, tada!Yeah, I know, not very grand, but still hope it'll serve the purpose and you actually learned something here.
Subscribe to:
Posts (Atom)
